Assembly: Tool Vault 55 / 72 / 84 Inch Hutch
REQUIRED TOOLS
Drill, 10mm Wrench, 14mm Wrench
REMOVE THE TOP MAIN DRAWER OF THE ROLLER CABINET AND CAREULLY SET DOWN ON A CARDBOARD SURFACE AS NOT TO SCRATCH THE DRAWER.
Un-bolt the stainless steel top from the inside.

2. REMOVE STAINLESS STEEL OR MDF WORKTOP FROM ROLLER CABINET
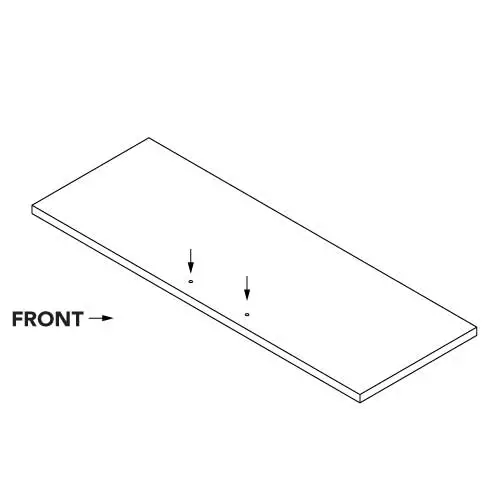
3. FLIP OVER, AND DRILL OUT HOLES ON STAINLESS STEEL OR MDF WORKTOP

4. REPLACE WORKTOP ON TOP OF THE BASE CABINET
Ensure drilled holes on worktop align properly with the weld nuts on the roller cabinet.

5. OPEN HUTCH CARTON
Remove packing materials and set hardware bag aside.

6. REMOVE FOLDED PRODUCT FROM CARTON

7. OPEN SIDES

8. INSTALL THE MIDDLE SHELF

9. LIFT TOP FROM BACK, FASTEN BOLTS ON TOP

10. REMOVE BRACKET TO ALLOW THE DOOR TO CLOSE
The bracket will be located at the top left and right interior of your hutch, exactly 24” away from the front.

11. SLIDE THE DOOR OUT, CLOSE THE DOOR

12. INSTALL LIFTING RING BOLTS
Insert the M12x30 RING BOLTS (4 PCS) into the 4 weld nuts on top of the hutch. Tighten securely, as these will be used to stack the hutch on top of the roller cabinet.

13. STACK HUTCH ON CABINET
Attach a crane or other lifting device to the ring bolts, stack the hutch on top of the roller cabinet. Align holes to pre-drilled holes on work top.

14. FASTEN HUTCH TO CABINET
Fasten hutch to cabinet with 14MM HEX BOLTS and WASHER on each corner through the pre-drilled holes to the weld nuts.